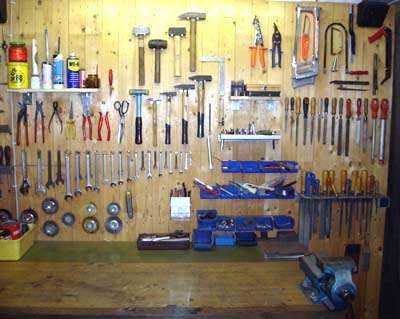
Tools
The basis for nuts and bolts!
It never seems to fail, that the tool we need at any particular moment is the one we don‘t have.
I would therefore like to share with you a list of the most important and
frequently required tools.
If you plan on not losing or misplacing your tools, or can scarf them away from your teenage sons and their friends, buy only the best tools. Some manufacturers offer lifetime warranties against breakage. Pay the money up front. Long after the pain of the high price is forgotten, the joy of using your high quality tools will stay with you for life.
Socket Wrenches
It would be best to have two sets of combination wrenches, one of each six point and twelve point. Also get yourself a full set of screwdrivers, both blade type and Phillips.
Next, a complete set of socket wrenches in the three smaller drive series ¼”, 3/8”and ½”
For nuts and bolts up to M6 with 10mm across the flats, use a ¼” drive. For use with M8, or 13-14mm across the flats, use a 3/8” drive
Remember that the joy of using a high quality tool will out last the memory of what you paid for it.

A few sizes larger…
A pair of water pump pliers (pipe pliers) can under special circumstances break a large nut loose. However, use of the wrong tools, especially a large set of water pump pliers will surely leave deep gouges on non-replaceable parts.
Wrench sizes in 27, 36, 41, and 46 mm are these days seldom found in your everyday tool store. However, for example, the 36 mm size nut or bolt is quite commonly found on a flywheel from a ‘fifties or ‘sixties engine. As with the flywheel mentioned above, the steering head bearings are fastened with two large nuts, usually 36 and 41 mm.
Take a look at eBay or your local parts for sale message boards to find some of these larger wrenches.
If you are living in the ‘States, expensive wrenches made by Snap On, SK, MAC are available. Some auto parts stores, (Auto Value, NAPA) sell combination wrenches made in Taiwan. The quality is excellent and the tools come with a lifetime warranty. For example, a 24 mm combination wrench sells for $20.00USD.
A combination wrench is a two part spanner, one end has open parallel jaws, the other end is closed with either six or twelve point steps to hold the nut or bolt head.

Nuts and Bolts
It is good to have an assortment of nuts, bolts, studs, and various flat and locking washers on hand. These could be zinc plated steel or made from stainless, as you like. Said possession can save you hair pulling fits of frustration during your restoration.
Under the LINKS section, you will find several address for fastener suppliers.

A Good Vise
A good, old or new vise is just about impossible to do without. It should have jaws as wide as 100-125 mm, about 4 to 5 inches. Having the option of a rotating vise with interchangeable jaws and locking them in place is a definite plus.
You would also do well to have a second standard, or simple vise mounted at the other end of your work bench. You will be using it.

Removable Jaws
A must for your vise, would be a set of ‘soft removable jaws’ made of copper, brass or aluminum. They will protect your work from damage caused by the otherwise impressions from the hard faced jaw serrations.
On the left, please note the pair of rubber faced removable jaws with the magnetic strip on the back. Right are a pair of homemade jaws from some scrap extruded aluminum.
Your objective here can be fulfilled with a number of variations.

Taps and Dies
For any restoration, cutting dies and taps are an indispensable part of one’s tool inventory. Seldom needed on newer machines, these tools will be used regularly to repair and clean up ugly damage or otherwise rusted threaded holes and studs.
For those who cannot afford the larger sized cutting dies, thread files are available, and will do in a pinch. See bottom tool in photo.

Thread Repair
HELICOIL is probably the most widely known maker of thread repair kits. Other makers are known, some for serious hobbyists. All the available kits are based on a single principle, that the offending threaded hole will be bored, drilled or reamed to a larger size, re-threaded and an insert installed that will bring the threaded diameter back to the original size.
HELICOIL uses a precision wound stainless wire that is installed with a special tool included with the kit. This will only work if there is enough
material left inside the damaged threaded hole to allow for the oversized threads to hold the insert fast.
For holes that have been seriously damaged or previously drilled off center, larger inserts are either available or can be machined. This would be work for your local machine

Pullers part 1
Pullers are readily available in a variety of types. Shown here are three of the most commonly available types. These pullers will allow you to remove gears and bearings from various shafts without damage. Before you pick up a hammer and chisel or smash something with a wrecking bar, reach for the appropriate tool. As we already know, the use of the wrong tool can damage an priceless part. In the States check your local Auto-Zone, NAPA store or other favourite auto parts place.

Special Pullers part 2
There are several types of inside pullers. They are primarily used to remove bearings and bushings from blind holes. Such a hole would be the rear most camshaft bearing in a BMW single or twin engine case.
Their function is relatively simple: Unscrew the locking bolt until the mechanism can be inserted into the inner race of the bearing. You will notice the ends of the mechanism are flared outwards. When you screw the bolt in, it tightens the mechanism against the inner race. The flared ends will then be locked on the other side of the bearing, holding itself tightly inside. Connect the main shaft of the puller with the mechanism and secure the two arms of the puller on the housing. Tightening the nut removes the bearing.

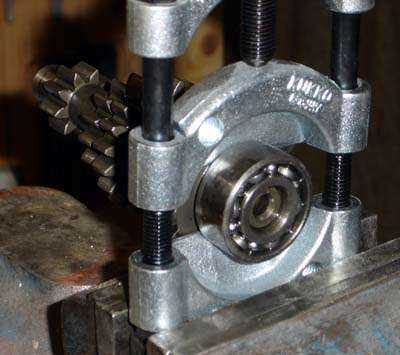
Special Pullers part 3a
This puller is used in tight spots, where you can't insert the jaws of a two or three arm puller. The principle is very much like using the jaws of a wire cutter. The lower jaw is locked in place while the upper jaw slides along the two parallel shafts. The sliding jaw is forced against the work by a central lead screw. As the two jaws close the bearing or gear is partly removed.
Special Puller part 3b
In this photo a puller body similar to the previous pullers already discussed is inserted into the threaded holes in the two jaws. Simply draw down on the central lead screw of the newly attached puller body to finish the work.

Valve Spring Compression Tool
UThis a special made tool similar to commercially made tools available at your auto parts store. This tool is used to compress the valve spring assembly allowing the valve keepers, or sometimes called keys, to be easily removed. If you have never removed valves from a cylinder head before, the two keepers lock into the top of the valve and are held in place under spring tension with the aid of the upper spring retainer. The inside of the upper spring retainer is shaped like an inverted cone. The keepers are made of a split cylinder with conical surfaces corresponding to the inverted cone inside the retainer. The tighter the spring tension on the upper retainer, the tighter will be the hold of the keepers onto the valve stem. It is an ingenious design. Simply compress the spring and the keepers will fall out or you can use tweezers or magnets to pick up the keepers. Release the spring tension carefully on the tool, and the entire valve assembly will slide out of the head.

Lapping Compound, Wooden Support Blocks and Other Neat Stuff
In order to reseat valves a good quality carborundum lapping compound should be used. You should have both coarse and fine grades in your arsenal.
Once your valves are removed, check the clearance between the valve stems and guides. If they are loose, they need to be replaced. If within spec., and there are any deformities or signs of erosion on either the valve seat or the valve head, proceed with applying a small amount of fine lapping compound to the valve seat. Insert the valve (make sure there is some oil on the valve stem) and either using the rubber suction cup affair seen in the photo, or a motorized hand drill with three jaw chuch from the opposite end of the valve, rotate the valve and apply light pressure against the valve seat.
Release and repeat several times. Clean up and examine both the seat and corresponding mating surface on the valve. When finished, rinse in solvent untill you are satisfied that all the lapping compound is removed.
The wooden support blocks far right are used to keep the connecting rods in place and consequently help keep the crankshaft from rotating while installing the cylinders. Simply slip one block around each of the connecting rods between the pistons and crankcase. Once the rings are compressed and the cylinder slipped on, remove the block and finish mountting the cylinder on the engine case.
The blocks need to be narrower than the distance between the cylinder base studs, and the slot wider than the thickness of the connecting rod.
You should be able to make your own blocks. If you want to really get fancy, you can have a cabinet maker cut some out of an exotic wood and finish them with several coats of tung oil and Danish rubbing oil. You could be the only guy on your street with connecting rod supports made from Bubinga or Circassion Walnut.

Dealing With Rust
Fertan is a slightly acidic product that reduces Ferric Oxide (rust) to Ferrous Oxide, which is then easily washed off with warm water and detergent (dish detergent works fine. See Mama in the kitchen. If you are nice to her, she'll let you have a few ounces).
This chemical leaves a coating of Iron Phosphate, sometimes known as a Parkerized finish.The Iron Phosphate is rust resistant and also leaves a slightly matt tooth for paint to adhere to.
For more detailed information about Fertan have a look to
Fertan America: www.fertanamerica.com/
or
Fertan UK: www.fertan.co.uk/

Bike Lift
For beginning at around a hundred dollars and up, you save yourself from knee and back pain and be able to comfortably concentrate on your bike. The more complicated and larger the more expensive the lifts get. All the same, buying a good lift is a good investment. If you have a strong ceiling, you can also use a winch and pulley system to suspend your bike.
